JS 语法与生命周期
语法
HML语法参考
HML(HarmonyOS Markup Language,鸿蒙标识语言)是一套类HTML(Hypertext Markup Language,超文本标记语言)的标记语言,通过组件、事件构建出页面的内容。页面具备数据绑定、事件绑定、列表渲染、条件渲染等高级能力。
<!-- xxx.hml -->
<div class="item-container">
  <text class="item-title">Image Show</text>
  <div class="item-content">
    <image src="/common/xxx.png" class="image"></image>
  </div>
</div>
<!-- xxx.hml -->
<div onclick="changeText">
  <text> {{content[1]}} </text>
</div>
// xxx.js
export default {
    data: {
        content: ['Hello World!', 'Welcome to my world!']
    },
    changeText: function() {
        this.content.splice(1, 1, this.content[0]);
    }
}
说明:
- 针对数组内的数据修改,请使用splice方法生效数据绑定变更。
- hml文件中的js表达式不支持ES6语法。
事件通过'on'或者'@'绑定在组件上,当组件触发事件时会执行JS文件中对应的事件处理函数。
事件支持的写法如下:
- "funcName":funcName为事件回调函数名(在JS文件中定义相应的函数实现)。
- "funcName(a,b)":函数参数例如a、b(可以为常量),或是在JS文件中的data中定义的变量(前面不用写this)。
-
示例
 <!-- xxx.hml -->
 <div class="container">
     <text class="title">{{count}}</text>
     <div class="box">
         <input type="button" class="btn" value="increase" onclick="increase" />
         <input type="button" class="btn" value="decrease" @click="decrease" />
         <!-- 传递额外参数 -->
         <input type="button" class="btn" value="double" @click="multiply(2)" />
         <input type="button" class="btn" value="decuple" @click="multiply(10)" />
         <input type="button" class="btn" value="square" @click="multiply(count)" />
     </div>
 </div>
/* xxx.js */
 export default {
     data: {
         count: 0
     },
     increase() {
         this.count++;
     },
     decrease() {
         this.count--;
     },
     multiply(multiplier) {
         this.count = multiplier * this.count;
     }
 };
/* xxx.css */
 .container {
     display: flex;
     flex-direction: column;
     justify-content: center;
     align-items: center;
     left: 0px;
     top: 0px;
     width: 454px;
     height: 454px;
 }
 .title {
     font-size: 30px;
     text-align: center;
     width: 200px;
     height: 100px;
 }
 .box {
     width: 454px;
     height: 200px;
     justify-content: center;
     align-items: center;
     flex-wrap: wrap;
 }
 .btn {
     width: 200px;
     border-radius: 0;
     margin-top: 10px;
     margin-left: 10px;
 }
<!-- xxx.hml -->
<div class="array-container">
  <!-- div列表渲染 -->
  <!-- 默认$item代表数组中的元素, $idx代表数组中的元素索引 -->
  <div class="div_item1" for="{{array}}" tid="id" onclick="changeText">
    <text>{{$idx}}.{{$item.name}}</text>
  </div>
  <!-- 自定义元素变量名称 -->
  <div class="div_item2" for="{{value in array}}" tid="id" onclick="changeText">
    <text>{{$idx}}.{{value.name}}</text>
  </div>
  <!-- 自定义元素变量、索引名称 -->
  <div class="div_item3" for="{{(index, value) in array}}" tid="id" onclick="changeText">
    <text>{{index}}.{{value.name}}</text>
  </div>
</div>

// xxx.js
export default {
    data: {
        array: [
            {id: 1, name: 'jack', age: 18},
            {id: 2, name: 'tony', age: 18},
        ],
    },
    changeText: function() {
        if (this.array[1].name === "tony"){
            this.array.splice(1, 1, {id:2, name: 'Isabella', age: 18});
        } else {
            this.array.splice(2, 1, {id:3, name: 'Bary', age: 18});
        }
    },
}
/** css **/
.array-container{
    width: 100%;
    height: 100%;
    display: flex;
    justify-content: center;
    align-items: center;
    background-color: white;
}
.div_item1{
    width: 100px;
    height: 200px;
    flex-direction: column;
    background-color: blue;
}

.div_item2{
    width: 100px;
    height: 200px;
    flex-direction: column;
    background-color: gray;
}

.div_item3{
    width: 100px;
    height: 200px;
    flex-direction: column;
    background-color: red;
}

.text_item{
    color: black;
    width: 100px;
    height: 300px;
    text-align: left;
    font-size: 30px;
}
tid属性主要用来加速for循环的重渲染,旨在列表中的数据有变更时,提高重新渲染的效率。tid属性是用来指定数组中每个元素的唯一标识,如果未指定,数组中每个元素的索引为该元素的唯一id。例如上述“tid="id"”表示数组中的每个元素的id属性为该元素的唯一标识。for循环支持的写法如下:
- for="array":其中array为数组对象,array的元素变量默认为$item。
- for="v in array":其中v为自定义的元素变量,元素索引默认为$idx。
- for="(i, v) in array":其中元素索引为i,元素变量为v,遍历数组对象array。
须知:
- 数组中的每个元素必须存在tid指定的数据属性,否则运行时可能会导致异常。
- 数组中被tid指定的属性要保证唯一性,如果不是则会造成性能损耗。比如,示例中只有id和name可以作为tid字段,因为它们属于唯一字段。
- tid不支持表达式。
条件渲染分为2种:if/elif/else和show。两种写法的区别在于:第一种写法里if为false时,组件不会在vdom中构建,也不会渲染,而第二种写法里show为false时虽然也不渲染,但会在vdom中构建;另外,当使用if/elif/else写法时,节点必须是兄弟节点,否则编译无法通过。实例如下:
<!-- xxx.hml -->
<div class="container">
  <input class="btn" type="button" value="toggleShow" onclick="toggleShow"/>
  <input class="btn" type="button" value="toggleDisplay" onclick="toggleDisplay"/>
  <text class="title" if="{{visible}}"> Hello-TV </text>
  <text class="title" elif="{{display}}"> Hello-Wearable </text>
  <text class="title" else> Hello-World </text>
</div>
/* xxx.css */
.container{
    width: 100%;
    height: 100%;
    flex-direction: column;
    align-items: center;
    background-color: white;
    justify-content: center;
}
.btn{
    width: 280px;
    font-size: 26px;
    margin: 10px;
}
.title {
    width: 300px;
    height: 36px;
    color: black;
    font-size: 30px;
}
// xxx.js
export default {
    data: {
        visible: false,
        display: true,
    },
    toggleShow: function() {
        this.visible = !this.visible;
    },
    toggleDisplay: function() {
        this.display = !this.display;
    }
}
优化渲染优化:show方法。
- 当show为true时,节点正常渲染。
- 当show为false时,仅仅设置display样式为none。
<!-- xxx.hml -->
<div class="container">
  <input class="btn" type="button" value="toggle" onclick="toggle"/>
  <text style="color: red;" show="{{visible}}" > Hello World </text>
</div>
/* xxx.css */
.container{
    width: 100%;
    height: 100%;
    flex-direction: column;
    align-items: center;
    background-color: white;
    justify-content: center;
}
.btn{
    width: 280px;
    font-size: 26px;
    margin: 10px;
}
// xxx.js
export default {
    data: {
        visible: false,
    },
    toggle: function() {
        this.visible = !this.visible;
    },
}
说明: 禁止在同一个元素上同时设置for和if属性。
CSS语法参考
CSS是描述HML页面结构的样式语言。所有组件均存在系统默认样式,也可在页面CSS样式文件中对组件、页面自定义不同的样式。
为了模块化管理和代码复用,CSS样式文件支持“@import”语句导入css文件。
每个页面目录下存在一个与布局hml文件同名的css文件用来描述该hml页面中组件的样式,决定组件应该如何显示。
-
内部样式,支持使用style、class属性来控制组件的样式。例如:
-
导入外部样式文件。例如,在common目录中定义样式文件“style.css”,并在“index.css”文件首行中进行导入:
/* style.css */
 .title {
     font-size: 38px;
 }
/* index.css */
 @import '../../common/style.css';
.container {
     width: 100%;
     height: 100%;
     align-items: center;
     background-color: white;
     flex-direction:column;
     justify-content: center;
 }

<!-- index.hml -->
<div class="container">
   <text class="title" style="color: red">Hello World</text>
 </div>
CSS选择器用于选择需要添加样式的元素,支持的选择器如表1所示。
表 1 CSS选择器
选择器 |
样例 |
样例说明 |
|---|---|---|
.class |
.container |
用于选择class="container"的组件。 |
#id |
#titleId |
用于选择id="titleId"的组件。 |
, |
.title, .content |
用于选择class="title"和class="content"的组件。 |
示例:
<!-- 页面布局xxx.hml -->
<div id="containerId" class="container">
  <text id="titleId" class="title">标题</text>
  <div class="content">
    <text id="contentId">内容</text>
  </div>
</div>
/* 页面样式xxx.css */
/* 对class="title"的组件设置样式 */
.title {
    width: 150px;
    height: 70px;
    color: black;
    font-size: 38px;
}
/* 对id="contentId"的组件设置样式 */
#contentId {
    width: 150px;
    height: 70px;
    color: black;
    font-size: 38px;
}
.content{
    width: 150px;
    height: 70px;
    background-color: white;
}
/* 对所有class="title"以及class="content"的组件都设置padding为5px */
.title, .content {
    padding: 5px;
}
#containerId{
    width: 100%;
    height: 100%;
    background-color: white;
}
#titleId{
    color: green;
}
.container {
    width: 100%;
    height: 100%;
    align-items: center;
    flex-direction:column;
    justify-content: center;
}
CSS伪类是选择器中的关键字如表2所示,用于指定要选择元素的特殊状态。
表 2 CSS伪类
名称 |
支持组件 |
说明 |
|---|---|---|
:active |
input[type="button"] |
表示被用户激活的元素,如:被用户按下的按钮。轻量级智能穿戴上伪类选择器上仅支持background-color 和background-image的样式设置。 |
:checked |
input[type="checkbox"、type="radio"] |
表示checked属性为true的元素。轻量级智能穿戴上伪类选择器上仅支持background-image的样式设置。 |
设置按钮的“:active”伪类可以控制被用户按下时的样式,伪类示例如下:
<!-- index.hml -->
<div class="container">
  <input type="button" class="button" value="Button"></input>
</div>
/* index.css */
.container{
    width: 100%;
    height: 100%;
    align-items: center;
    justify-content: center;
}
.button:active {
    background-color: #888888;/*按钮被激活时,背景颜色变为#888888 */
}
JS语法参考
JS文件用来定义HML页面的业务逻辑,支持ECMA(European Computer Manufacturers Association,欧洲计算机制造商协会)规范的JavaScript语言。基于JavaScript语言的动态化能力,可以使应用更加富有表现力,具备更加灵活的设计能力。下面讲述JS文件的编译和运行的支持情况。
支持ES6语法。轻量级智能穿戴支持的ES6语法有限,仅支持以下ES6语法:let/const、arrow functions、class、default value、destructuring assignment、destructuring binding pattern、enhanced object initializer、for-of、rest parameter、template strings。
-
模块声明
使用import方法引入功能模块:import router from '@system.router';
-
代码引用
使用import方法导入js代码:import utils from '../../common/utils.js';
表 1 页面对象
属性 |
类型 |
说明 |
|---|---|---|
data |
Object/Function |
页面的数据模型,类型是对象或者函数,如果类型是函数,返回值必须是对象。属性名不能以$或_开头,不要使用保留字for、if、show、tid。 |
$refs |
Object |
持有注册过ref属性的DOM元素或子组件实例的对象。示例请参见“获取DOM元素”。 |
通过$refs获取DOM元素代码示例如下:
 <!-- index.hml -->
 <div class="container">
   <image-animator class="image-player" ref="animator" images="{{images}}" duration="1s" onclick="handleClick"></image-animator>
 </div>
// index.js
 export default {
     data: {
         images: [
             { src: '/common/frame1.png' },
             { src: '/common/frame2.png' },
             { src: '/common/frame3.png' },
         ],
     },
     handleClick() {
         const animator = this.$refs.animator; // 获取ref属性为animator的DOM元素
         const state = animator.getState();
         if (state === 'paused') {
             animator.resume();
         } else if (state === 'stopped') {
             animator.start();
         } else {
             animator.pause();
         }
     },
 };
 /** css **/
.container {
    width: 100%;
    height: 100%;
    display: flex;
    justify-content: center;
    align-items: center;
    background-color: white;
}
.image-player{
    width: 210px;
    height: 210px;
    background-color: white;
}
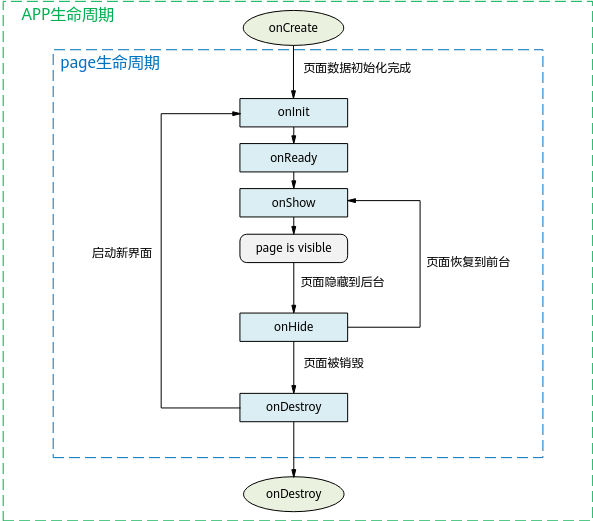
生命周期
在app.js中可以定义如表1所示应用生命周期函数。
表 1 应用生命周期函数
属性 |
类型 |
说明 |
触发时机 |
|---|---|---|---|
onCreate |
() => void |
应用创建 |
当应用创建时调用。 |
onDestroy |
() => void |
应用销毁 |
当应用退出时触发。 |
在页面JS文件中可以定义如表2所示页面生命周期函数。
表 2 页面生命周期函数
属性 |
类型 |
说明 |
触发时机 |
|---|---|---|---|
onInit |
() => void |
页面初始化 |
页面数据初始化完成时触发,只触发一次。 |
onReady |
() => void |
页面创建完成 |
页面创建完成时触发,只触发一次。 |
onShow |
() => void |
页面显示 |
页面显示时触发。 |
onHide |
() => void |
页面消失 |
页面消失时触发。 |
onDestroy |
() => void |
页面销毁 |
页面销毁时触发。 |
页面A的生命周期接口的调用步骤如下:
- 打开页面A:onInit() → onReady() → onShow()
- 在页面A打开页面B:onHide() → onDestroy()
- 从页面B返回页面A:onInit() → onReady() → onShow()
- 退出页面A:onHide() → onDestroy()
- 页面隐藏到后台运行:onHide()
- 页面从后台运行恢复到前台:onShow()
国际化
地区语言

在JS应用中添加语言资源:
JSApp工程中i18n目录添加应用所需语言strings资源内容,并在app中引用。
json文件的命名格式可参考:zh-CN.json、en-US.json。
支持范围限制:支持的语言符合ISO 639标准2字母或3字母语言码,支持的国家符合ISO 3166标准2字母国家码。
示例:
<!-- xxx.hml -->
<div class="container">
     <text class="title" on:click="exit">
        {{ $t('strings.hello') }} {{ $t('strings.world') }}
     </text>
</div>
应用名与图标资源:
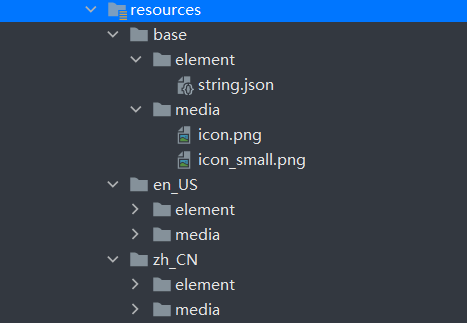
在entry→src→main→resources目录下,有base、en_US、zh_CN三个目录,分别代表默认、英语、中文资源,开发者可以根据不同语言、国家地区进行自定义。在其下级目录element中有“string.json”文件,修改其中value的值即可更改应用名称。其下级目录media中存储不同语言对应的图标资源文件。
说明: 发布包默认支持中英,客户根据商用字库能力按需扩展。 扩展时,请根据多语言资源数量按需调整
MAX_RES_CONFIG_NUM,定义位置见 global_utils.c。
切换语言:
请在产品Settings系统设置应用中添加语言设置,调用以下C++接口切换系统语言,并设置默认字体样式。
示例:
#include "global.h"
#include "product_adapter.h"
…
// 中文
GLOBAL_ConfigLanguage("zh-CN");
// 英文
GLOBAL_ConfigLanguage("en-US");
// 根据语言设置对应的JS默认字体样式,参数1是字体名称,参数2是字体大小。
ACELite::ProductAdapter::SetDefaultFontStyle("FontName.ttf", 24);
…
说明: 语言等相关配置,需在Settings中管理持久化。在系统启动时,查询持久化配置,调用global API初始化JSApp语言和默认字体样式。
由于 HelloWorld 示例只展示了最小页面,开发实际 JS 应用时可以继续参考以下组件和接口能力,用于扩展页面布局、交互事件、系统服务调用和设备能力访问。